
| Go to the faculty page for James Tam | Return to the CPSC 203 web page |
You need to transfer the files for your webpage to a location accessible by the web server. The UC-IT web server will look for a folder called 'public_html' which is a sub folder of a folder called "WebDisk". The program to carry out the transfer is called "FileZilla". If you are a campus computer then check if that particular computer lab has this program installed. The one lab that was used by one of our techs for testing that does have FileZilla installed is the Tri-Labs (SS018) in the basement of the Social Sciences building. If you wish you can download and install FileZilla on your home computer in order to make the transfer as well.
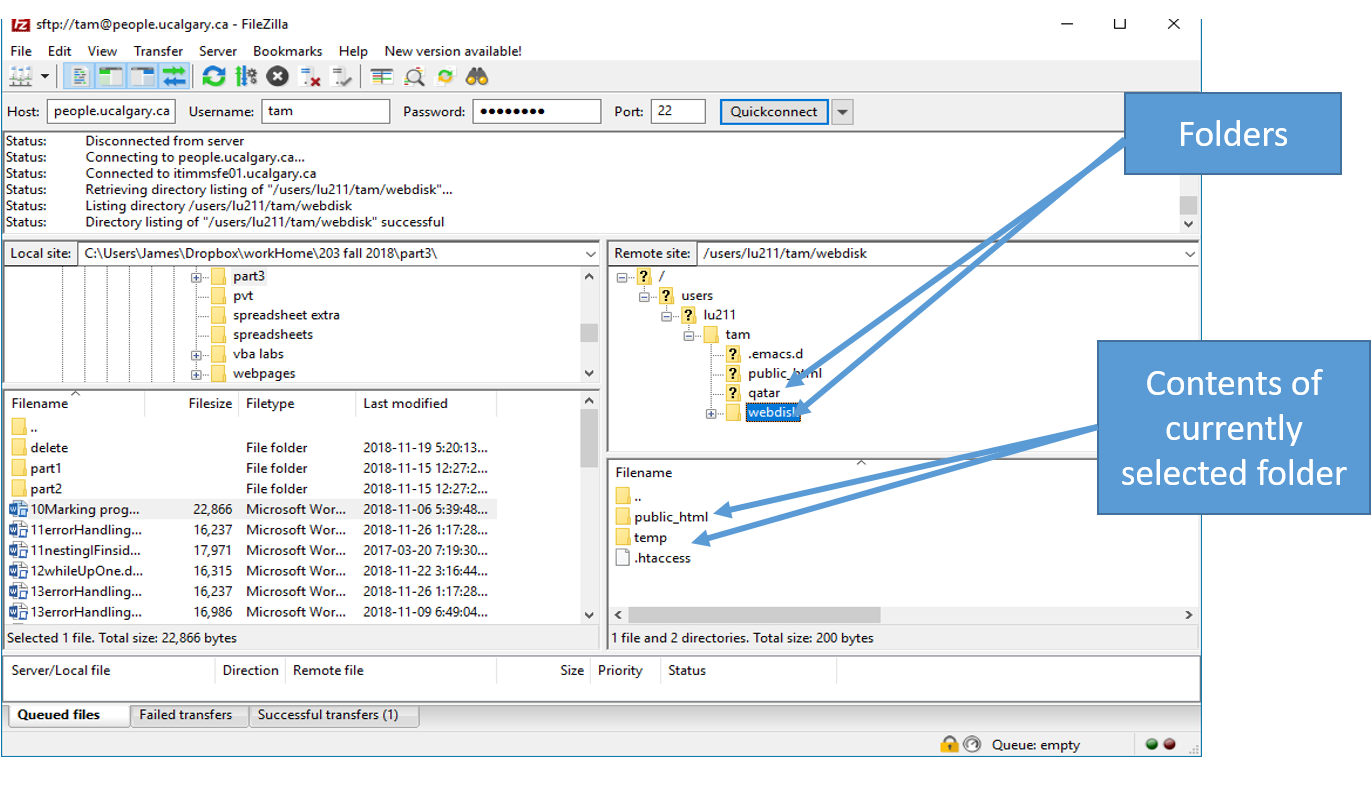
When you start FileZilla you should see something similar to the following:
The pane at the bottom left show the folders and files on my local computer. When I login to another computer (e.g. the university web server) then the folders and files on my UC-IT account will appear in the pane at the bottom right.
You need to enter 4 pieces of information:
- The address of the computer that you wish to connect/login to: people.ucalgary.ca
- Your University of Calgary login name (for you I believe it should match your login name on the myucalgary portal/your email address)
- Your University of Calgary password
- The 'port number' - recall from the 'security' lectures when I talked about firewalls and ports (e.g. Port 25 was the old port for sending email): 22
Don't change anything else. Below is a screenshot of what I entered for my UC account (computer address and the port is the same for you and me, the rest will obviously be different). Click 'Quickconnet' after entering the information.
If you entered the correct login information then you should see the centre and bottom rights pane populated with the files and folders you have uploaded onto your university storage area. My account includes stuff I have uploaded previously, yours will likely just consist of of one folder 'WebDisk'
You can create/edit your web pages on the computer you are using and save them 'locally' (on your home hard drive or on a flash drive if you are working in the UC labs). For more information on how to do this refer to my lecture notes on web pages/html. Now that you have gotten this far transferring your files to the university WebDisk server is a easy. On the right hand center pane click on the 'webdisk' folder. This should contain a folder called 'public_html'. You will transfer any files needed for your web page to this folder (htm and html documents as well as images and videos you may want to add although we didn't have time to talk about multi-media this particular semester).
Before making any transfers: Keep in mind that anything transferred will be stored on a (publicly funded) post secondary computer and by default anything that you upload to the 'public_html' folder is viewable and even searchable on the public World-Wide Web. Common sense should prevail as to what is appropriate to upload but as a general rule of thumb anything related to: illegal activities, pornography or business-oriented material (because one shouldn't be making money a publicly funded system) should not be uploaded. Of course uploading any documents that combine the previously listed three categories would not be allowed either. If you want more specific information contact university IT: www.ucalgary.ca/it.
To transfer something from your local computer to the server you can drag and drop files from one location to another. In the image below I transferred one of my VBA examples to the university '11errorHandlingLoop.docm'. In the above image only file '.htaccess' is visible in the public_html folder (bottom right pane). After the transfer you can now see the VBA program in this folder in the bottom right pane of the image below.
To delete a file simply right click on it and a popup menu will appear. Select the 'delete' option.

