 Download and run ImageDrag2.zip
Extract this guy to your desktop, open the project file (called ImageDrag2.vbp) and hit play. Woh, that's tough! Check the next section for how it works.
When you run the program, you get two forms that look like this:
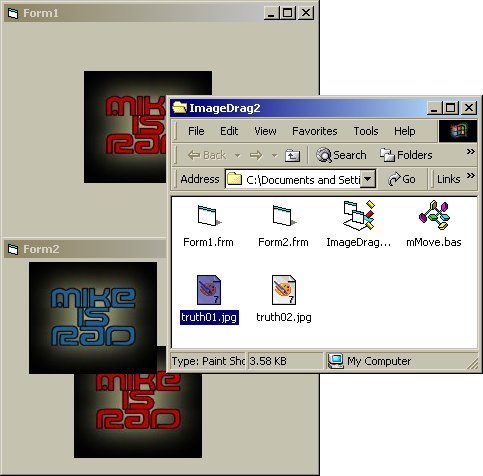
the program window & directory listing
Now I have included a snapshot of the directory listing for this project in this screenshot. As you can see, I've included two image files. You can drag and drop them onto either form: either one at a time, or you can select both of them at once and drag'n'drop'em. Wow, fantastic, eh?!
Here's the really cool part. If you left-click drag an image on either form, you can drag and drop them to the other form, alternately creating new images as you go.
Here's the extra cool part. If you right-click drag on any image on either form, you'll see that it happily moves around and stuff. Wow.
What can we say about this program? Minimal interface, eh?! Fabulous!!
OK, hopefully this isn't too painful, it's actually pretty straightforward I think! Way less complicated than the Database examples!!
Private Sub Form_Load()
    Moving = False
    mMove.Initialize Timer1
    Form2.Show
End Sub
'here's the actual drag'n'drop work
Private Sub Form_OLEDragDrop(Data As DataObject, Effect As Long, Button As Integer, Shift As Integer, X As Single, Y As Single)
    Dim i As Integer
    Dim NewIndex As Integer

    ' check to see source of drop event.
    Select Case Effect
        Case vbDropFilesFromExplorer
            'data.files is a collection of strings that are absolute paths to any files
            'dragged and dropped to the form.
            For i = 1 To Data.Files.Count
                NewIndex = Picture1.Count + 1

                'check to see if we've got an image file
                If ImageFileCheck(Data.Files(i)) Then
                    Load Picture1(NewIndex)
                    Picture1(NewIndex).Picture = LoadPicture(Data.Files(i))
                    Picture1(NewIndex).Visible = True
                End If
            Next i

        Case vbDropEffectCopy
            If Data.GetFormat(vbCFBitmap) Then
                NewIndex = Picture1.Count + 1
                Load Picture1(NewIndex)
                Picture1(NewIndex).Picture = Data.GetData(vbCFBitmap)
                Picture1(NewIndex).Visible = True
                Picture1(NewIndex).ZOrder
            End If

    End Select
End Sub
'checks to see if we've got an image file
Function ImageFileCheck(strFileName As String) As Boolean
    Dim strExtention As String

    'grab the file's extention
    strExtention = Right(strFileName, 3)

    'check the extention for an image type
    If (strExtention = "bmp") Or (strExtention = "jpg") Or _
        (strExtention = "gif") Then
        ImageFileCheck = True
    Else
        ImageFileCheck = False
    End If

End Function
Private Sub Picture1_MouseDown(Index As Integer, Button As Integer, Shift As Integer, X As Single, Y As Single)
    If Button = 1 Then
        Picture1(Index).OLEDrag
    ElseIf Button = 2 Then
        mMove.Begin Me.ActiveControl, Form1, X, Y
    End If
End Sub

Private Sub Picture1_MouseMove(Index As Integer, Button As Integer, Shift As Integer, X As Single, Y As Single)
    If Button = 2 Then mMove.InProgress X, Y
End Sub

Private Sub Picture1_MouseUp(Index As Integer, Button As Integer, Shift As Integer, X As Single, Y As Single)
    If Button = 2 Then mMove.EndIt
End Sub

Private Sub Picture1_OLEStartDrag(Index As Integer, Data As DataObject, AllowedEffects As Long)
    Data.SetData Picture1(Index).Picture, vbCFBitmap
    AllowedEffects = vbDropEffectCopy
End Sub
Private Sub Timer1_Timer()
    mMove.ToNewPosition Me.ScaleWidth, 0
End Sub
And that, as they say, is that.